Se qualcuno ha qualche idea sull'origine di questo temperino lo scriva nei commenti.
Visualizzazione post con etichetta ricostruzione. Mostra tutti i post
Visualizzazione post con etichetta ricostruzione. Mostra tutti i post
domenica 11 giugno 2023
Restauro vecchio coltellino chiudibile serramanico - Old knife restoration
Il nuovo video presenta il processo di recupero di un coltellino chiudibile a serramanico arrugginito e spezzato. Trovato un pezzo di lamierino adatto per sostituire la lama iniziamo la lavorazione. Dopo averlo stemprato lo lavoriamo e procediamo con la tempra e il rinvenimento. A questo punto dopo la pulizia e il montaggio passiamo all'affilatura a pietra.
Materiale usato nel video
Supergas Kemper
https://amzn.to/3HAxRuh
Kit Lanski
https://amzn.to/3kAUsvX
https://amzn.to/30ruLqW
Dreemel
https://amzn.to/3FYQJBf
Spazzola acciaio originale x dreemel
https://amzn.to/2Zf1pYb
Spazzola per lucidare in feltro x dreemel
https://amzn.to/3mfJgVx
Acido Cloridrico 1 litro e 5 litri
https://amzn.to/3pRIUHH
https://amzn.to/3sSqTLh
Evaporust
https://amzn.to/2NzQymf

venerdì 20 maggio 2022
Come ricostruire le palette in grafite di una pompa a vuoto
Un video un po' lungo in cui vi mostro come ho rimesso in sesto una pompa a vuoto che mi ha regalato un caro signore, purtroppo mancato proprio mentre stavo lavorando a questo video. Spero da lassù veda che ce l'ho fatta a mantenere la promessa di rimetterla in funzione.
Dopo svariate ricerche son riuscito a recuperare il manuale con tutti i codici dei ricambi, peccato non li facciano più.
La pompa a palette è il Model 1031-102A Shown della GAST ma è marchiata General Electric sulla carcassa.
Vi lascio qualche link in caso vi servissero alcuni componenti usati nel video
Pompa a vuoto
Teflon da idraulica/gas
Lastra in grafite
Foglio in vetronite ricoperta di rame per circuiti stampati
Cloruro ferrico
Vacuometro
Tester economico
Tester di qualità Fluke
Pagina instagram
https://www.instagram.com/storieefoto
Pagina Facebook
sabato 18 febbraio 2017
Ricostruzione coltellino piemontese a serramanico con cavatappi
Buonasera a tutti voi che ogni tanto fate un giro su storie e foto.
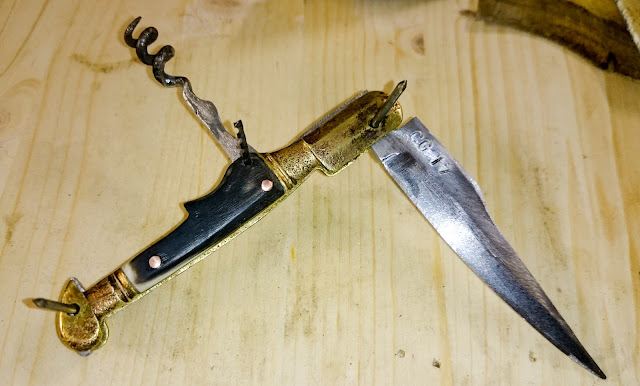
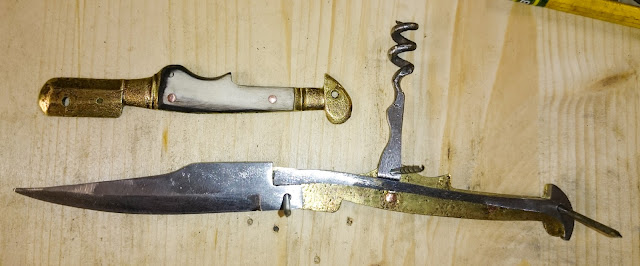
In questo post voglio raccontarvi come ho ricostruito un vecchio coltellino piemontese a serramanico con cavatappi. E' databile tra la fine del 1700 e il 1800, in origine aveva guancette con decori in corno di vacca e cavatappi.
E' stata una storia lunga e travagliata, causa una serie di errori che hanno allungato il lavoro.
Cercherò di farvi un resoconto in modo da evitare, a chi volesse cimentarsi in qualcosa di simile, di ripeterli.
Come sempre prima di andare avanti vi chiederei, dato che tutto quello che faccio è per passione, se poteste gentilmente fare qualche click sulle pubblicità a destra o sotto. Si aprirà una pagina di sponsor, a voi non costa niente e non ci sono virus essendo tutte pubblicità di google, poi potete richiuderla. In tasca mi viene qualche centesimo e mi copre quelle poche spese di dominio e sito internet. Grazie mille davvero.
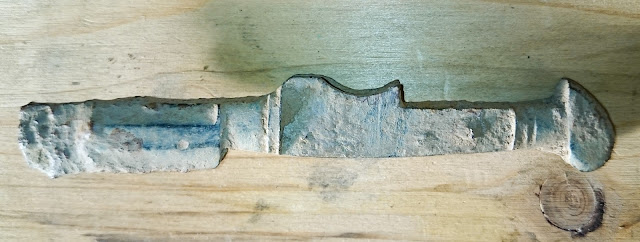

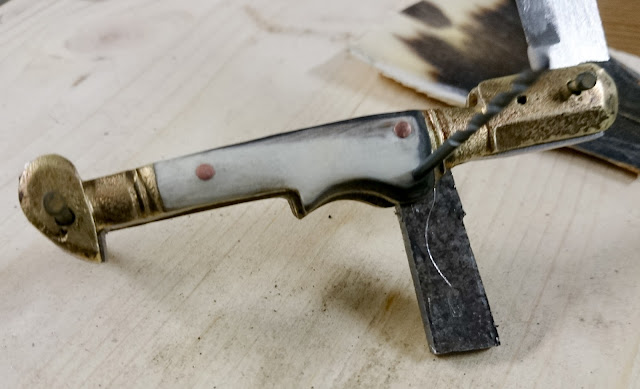
Facendo molta attenzione a non rompere la guancetta in basso che era già leggermente storta ho prima pulito e poi forato i perni che tenevano unito il tutto. In questo modo le due guancette in ottone si sono divise e le ho messe a bagno in una soluzione di acqua distillata e acido cloridrico. Dopo qualche ora ho estratto dal bagno e pulito col dreemel.
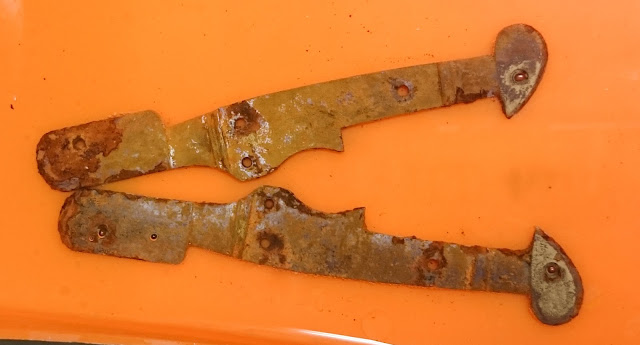
Sono anche riuscito a recuperare un pezzo della lama e l'archetto che fungeva da molla. In questo modo ho potuto fare i disegni e iniziare a lavorare.


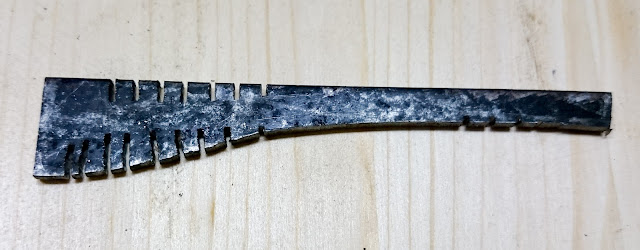





Tutto proseguiva per il verso giusto e quindi ho proseguito con la tempra. Questa volta ho fatto un video perché avevo troppi pezzi da temprare e poche mani per far le foto.
I pezzi dopo la tempra e il rinvenimento di 1 ora in forno a 200°C.



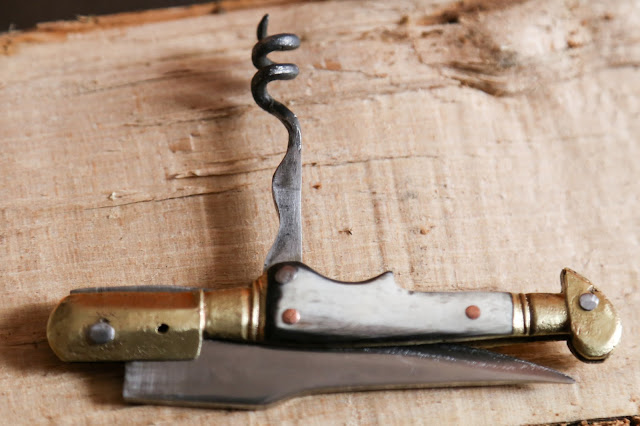


In questo post voglio raccontarvi come ho ricostruito un vecchio coltellino piemontese a serramanico con cavatappi. E' databile tra la fine del 1700 e il 1800, in origine aveva guancette con decori in corno di vacca e cavatappi.
E' stata una storia lunga e travagliata, causa una serie di errori che hanno allungato il lavoro.
Cercherò di farvi un resoconto in modo da evitare, a chi volesse cimentarsi in qualcosa di simile, di ripeterli.
Come sempre prima di andare avanti vi chiederei, dato che tutto quello che faccio è per passione, se poteste gentilmente fare qualche click sulle pubblicità a destra o sotto. Si aprirà una pagina di sponsor, a voi non costa niente e non ci sono virus essendo tutte pubblicità di google, poi potete richiuderla. In tasca mi viene qualche centesimo e mi copre quelle poche spese di dominio e sito internet. Grazie mille davvero.
Per prima cosa le condizioni di partenza, è stato ritrovato da un amico nell'orto. Sapendo la mia passione per questi oggetti me l'ha gentilmente regalato. Perciò lo ringrazio infinitamente.


Facendo molta attenzione a non rompere la guancetta in basso che era già leggermente storta ho prima pulito e poi forato i perni che tenevano unito il tutto. In questo modo le due guancette in ottone si sono divise e le ho messe a bagno in una soluzione di acqua distillata e acido cloridrico. Dopo qualche ora ho estratto dal bagno e pulito col dreemel.

Sono anche riuscito a recuperare un pezzo della lama e l'archetto che fungeva da molla. In questo modo ho potuto fare i disegni e iniziare a lavorare.


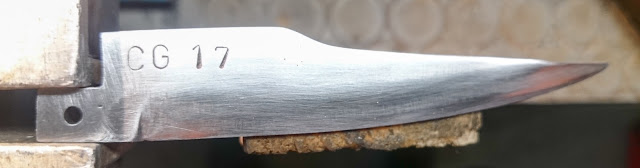
A questo punto ho disegnato la lama e l'archetto su una lamiera di C70 da 3 mm che era lo spessore originario del pezzo di lama recuperato.


Una volta segnata la linea di mezzeria con una punta dello stesso spessore ho iniziato a limare fino ad aver un filo di circa un decimo di mm.

A questo punto ho stoppato le lavorazioni sulla lama e ho iniziato le operazioni per produrre i due inserti in corno da applicare sulle guancette.
Non avevo mai lavorato prima il corno di mucca quindi vi spiegherò brevemente come lavorarlo per ottenere degli inserti o altri decori.
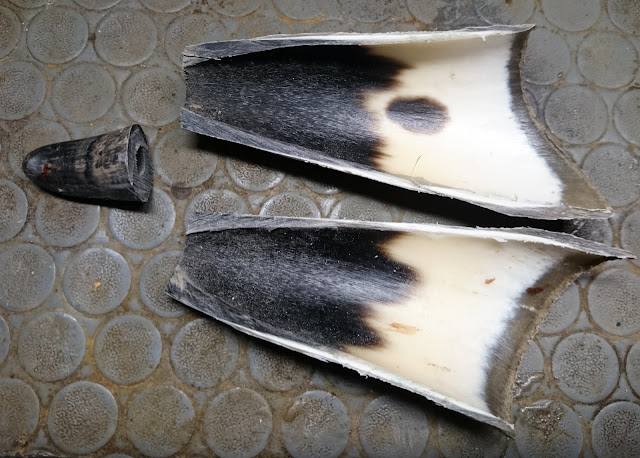
La prima cosa da fare è procurarsene uno e lasciarlo qualche tempo all'aria aperta per fargli perdere l'odore, vi consiglio almeno un anno. Io ne avevo recuperati alcuni da un allevatore qualche anno fa ed è stata l'occasione giusta per usarli. Dovete sezionare il corno eliminando la parte piena verso la punta, poi dividere la parte cava in due in senso longitudinale.
Vi troverete due mezzelune di corno che, per essere lavorate, andranno spianate. Nulla di difficile, basta scaldarle fin quando diventeranno malleabili. Io l'ho fatto con una pistola a caldo, ma potete metterle anche su una fiamma viva senza lasciarle per troppo tempo. Una volta calde le ho chiuse nella morsa e le ho lasciate fino a quando si sono raffreddate tornando alla loro durezza normale.


Ottenuto le due "piattine" di corno ho scartato la parte di destra che non è regolare ne come spessore ne come colore.
Ho poi forato i due inserti e ho iniziato a modellarli per riempire lo spazio che avrebbero poi occupato.


Quando sono arrivato ad avere la forma desiderata ho fissato le guancette al corno con una resina epossidica bicomponente e dei rivetti in rame ricavati assottigliando due chiodini.


A questo punto ho carteggiato il tutto per smussare angoli e dare uniformità allo spessore del corno. Seguiranno altre carteggiature e lucidature più accurate, è inutile arrivare a finiture elevate adesso.
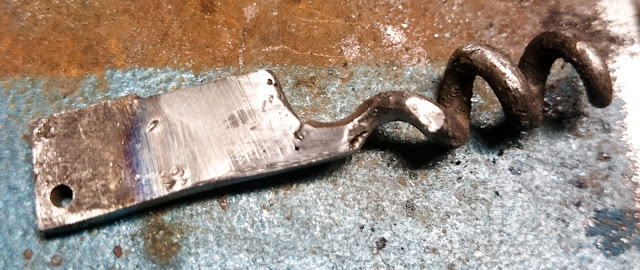
Dopo di ciò ho iniziato a pensare al cavatappi che fin dall'inizio è stato il punto che mi preoccupava di più perché non sapevo proprio da dove iniziare e come avrei fatto. Seguendo suggerimenti vari ho cannibalizzato un vecchio cavatappi da due soldi e l'ho saldato ad un pezzo di C70 che ho poi modellato a dovere.


Sono seguiti i primi montaggi di prova per vedere se tutto quadrava e se la molla faceva il suo lavoro.


Tutto proseguiva per il verso giusto e quindi ho proseguito con la tempra. Questa volta ho fatto un video perché avevo troppi pezzi da temprare e poche mani per far le foto.
I pezzi dopo la tempra e il rinvenimento di 1 ora in forno a 200°C.

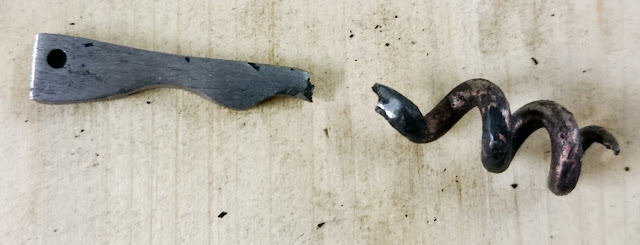
Ho quindi iniziato a rifinire il tutto con varie grane di carta vetro man mano più sottile fino ad arrivare all'effetto voluto. Tutto andava bene fino a quando ho dato la prima pulizia al cavatappi. Ho usato una spazzola d'acciaio e forse sarò stato un po' brusco, fatto sta che si è rotto in due pezzi. Per carità, meglio a questo punto che non alla fine durante una prova di funzionamento.


Non mi sono perso d'animo e ho iniziato a ricostruire il cavatappi questa volta però tutto in un unico pezzo. Utilizzando una fiamma e una pizza a beccucci conici ho "forgiato" le spire. Non sarà perfetto come il primo ma almeno non dovrebbe spezzarsi.


Ho rimontato il tutto.

Poi ho carteggiato e rifinito il più possibile.


venerdì 9 dicembre 2016
Ricostruzione antico coltellino a serramanico piemontese frabosano
Questa sera su storie e foto volevo mostrarvi l'ultimo lavoretto che ho fatto. In realtà è da un po' di tempo che lo ho iniziato, ma i lavori si sono allungati un po'.
Questa primavera durante una delle prime gite in montagna sono stato in zona Colla dei Termini, avevo anche scritto un articolo a proposito che trovate qui
http://storieefoto.blogspot.it/2016/07/dalla-colla-dei-termini-al-pizzo-di.html
durante il pranzo, sotto una pietra trovo della spazzatura, come solitamente accade chi va in montagna non è molto educato e abbandona i propri rifiuti dove capita. Inizio a metterla nella mia borsa degli scarti da portare a valle e trovo un pezzo di ferro arrugginito, li per li l'ho messo assieme al resto.
Quando arrivo a casa mi accorgo che era cosa rimaneva di un coltellino.
Sto per buttarlo quando tra me e me sorge il dubbio che quel pezzo di coltello potesse essere vecchio ed essendo comunque su un antico luogo di accampamenti settecenteschi mi fermo un attimo e provo a dargli una pulita.
Come sempre prima di andare avanti vi chiederei, dato che tutto quello che faccio è per passione, se poteste gentilmente fare qualche click sulle pubblicità a destra o sotto. Si aprirà una pagina di sponsor, a voi non costa niente e non ci sono virus essendo tutte pubblicità di google, poi potete richiuderla. In tasca mi viene qualche centesimo e mi copre quelle poche spese di dominio e sito internet. Grazie mille davvero.


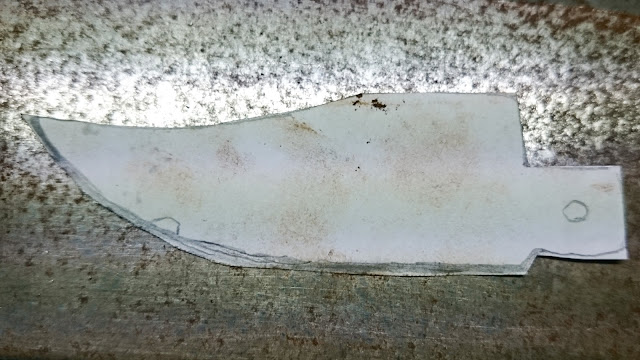

La lama è nata


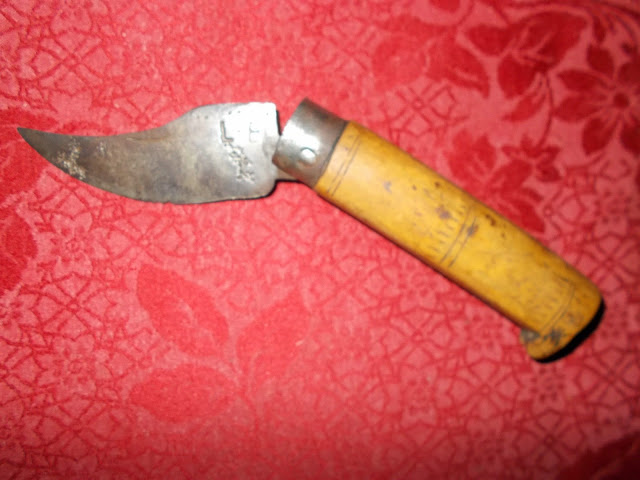
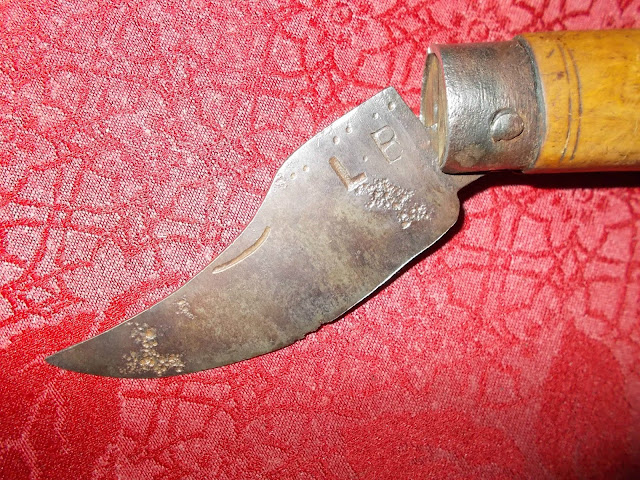


La prima piega l'ho fatta a mano, poi mi sono aiutato con la morsa e un pezzo di legno sul dorso del coltello per tenere il collarino a filo del manico. Ogni tanto il collarino andava scaldato con una fiamma per renderlo più malleabile.

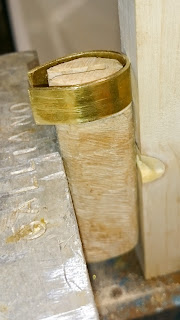
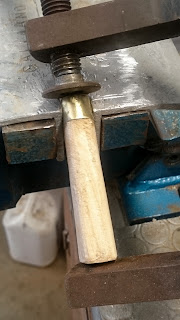

A questo punto con una smerigliatrice a nastro ho rifinito e pareggiato il tutto.


A questo punto ho montato il tutto.
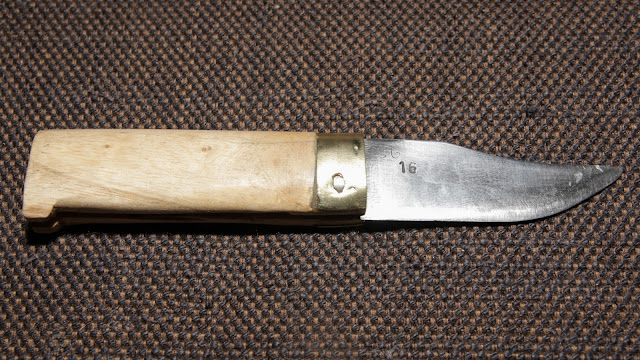
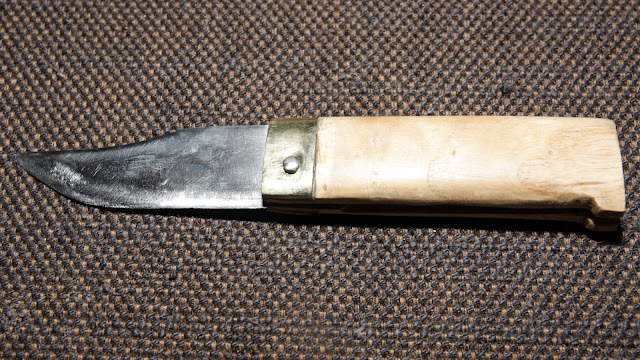
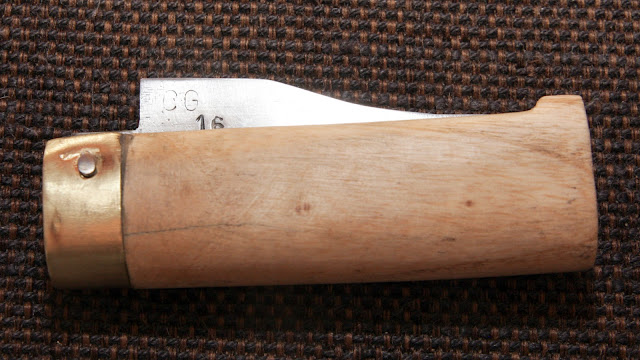

Come perno ho usato un chiodo precedentemente stemprato. In questa fase ho avuto un problema, il primo che avevo usato mi si è rotto all'interno durante il martellamento così ho dovuto rimuoverlo creando un piccolo segno sul collarino.

This evening of stories and pictures I wanted to show the last job I did. In fact it is a bit 'of time I began, but work has lengthened a bit'. This spring, during one of the first mountain tours have been in the area of Termini Colla, it even wrote an article about it here
http://storieefoto.blogspot.it/2016/07/dalla-colla-dei-termini-al-pizzo-di.html
during lunch, under a stone I find the garbage, as usually happens those who go to the mountains is not very polite and leave their waste wherever it happens. I start to put it in my bag of waste to take to the valley and find a piece of rusty iron, for them I put them with the rest. When I get home I realize that was what remained of a boxcutter. I'm about to throw it when myself doubt whether that piece of knife could be old and still being on an ancient place of eighteenth camps I stop a moment and try to give it a clean.
Here's the blade "clean" with copper or brass collar, I went light because there would be nothing left. The thing that stopped me from throwing it was that kind of letter L followed by a period and perhaps traces of a B.
At this point I began researching, I logically concentrated on the area knives, and behold, shortly after I run into these sites
http://www.frabusan.it/Storia.htm
http://www.comune.frabosasoprana.cn.it/Home/Guidaalpaese/tabid/28454/Default.aspx?IDDettaglio=11351
here it says the frabosano knife, or rather Frabusan, and motions to a certain Liprandi already producing them in the nineteenth century, and perhaps even the end of 1700. That is just the remnant of one of these old Piedmont knives? Maybe it used by our ancestors who had been sent to defend their lands from invading French? We'll never know, but the shape of the blade, L prominently, the decoration of their collar fans hope. It passes some time and I continue to find the blade every time I put in place the workbench, are undecided whether to throw it or what to do, we can not finish in the window in that state and that's how it is a bizarre idea, I try to rebuild it as it should be. First we derive the blade.
I took a piece of the blade of an industrial band saw 2 mm thick and I started to work it.
I then marked a halfway line thickness using a 2 mm drill bit and started to shave. Have come to have the thread which was about half a millimeter, the finish will be given after the hardening with glass and stone paper. At this point I started to think about how it would have been the handle, unfortunately I have not found much information, the only photos in which you could see in a decent a frabusan were these: I found this board pinterest https://it.pinterest.com/fedcarlini/italian-traditional-knives/. I also learned that the decorations on the handle, normally in boxwood, indicate the master knife maker that produced it. They are a sort of trademark, each had its decor, unlike any other. To start I took the handle of an old hammer that were broken and I made up for the purpose.
When the handle I felt they had a satisfactory shape, I started working on the collar. This was the most difficult part because it was the first time that I was doing it and adapt to the brass plate to the shape of the handle is not easy.
First I drew a line measurement of the collar and started to remove material to a thickness of 1 mm.
By rotating on a sheet of paper the handle I plotted the size of the collar, I then used the sheet to mark the fixing holes for the blade.
The first fold I made it by hand, then I helped with the vice and a piece of wood on the back of the knife to hold the collar of the handle wire. Sometimes the collar was heated with a flame to make it more malleable.
Once the collar is fitted to the handle, the I glued and drilled using the slip of paper that had drawn previously. During this phase I inserted the blade inside and a thickness of not unmold the handle or break it.
At this point with a belt grinder I finished and drew the whole. Now that the neck and the collar were over it was time to end the processing of the blade. The first step was the hardening, to execute it, being the small blade, I simply heated to cherry red with the help of a torch. Later I immersed in oil. It 'very small so it is not the case of thinking too much about how to put it, I have simply thrown to the bathroom. Once the quenching is performed the necessary tempering which serves to eliminate the internal tensions that are created during the thermal shock. For this operation I left the blade in the oven at 180 ° C for one hour. After the discovery I started working with sandpaper grit increasingly order to clean and give the thread to the blade. After a few hours of work and a lot of patience the blade was finally worthy of being called by that name. As pin I used a nail previously stemprato. At this stage I had a problem, the first I had used I broke inside during the pounding so I had to remove it by creating a small mark on the neck. I do not put decorations on the handle it on the neck because, as explained above, are customizations that put the real master knife makers. And finally here it is with what remains of his great-great grandfather battered.
Questa primavera durante una delle prime gite in montagna sono stato in zona Colla dei Termini, avevo anche scritto un articolo a proposito che trovate qui
http://storieefoto.blogspot.it/2016/07/dalla-colla-dei-termini-al-pizzo-di.html
durante il pranzo, sotto una pietra trovo della spazzatura, come solitamente accade chi va in montagna non è molto educato e abbandona i propri rifiuti dove capita. Inizio a metterla nella mia borsa degli scarti da portare a valle e trovo un pezzo di ferro arrugginito, li per li l'ho messo assieme al resto.
Quando arrivo a casa mi accorgo che era cosa rimaneva di un coltellino.
Sto per buttarlo quando tra me e me sorge il dubbio che quel pezzo di coltello potesse essere vecchio ed essendo comunque su un antico luogo di accampamenti settecenteschi mi fermo un attimo e provo a dargli una pulita.
Come sempre prima di andare avanti vi chiederei, dato che tutto quello che faccio è per passione, se poteste gentilmente fare qualche click sulle pubblicità a destra o sotto. Si aprirà una pagina di sponsor, a voi non costa niente e non ci sono virus essendo tutte pubblicità di google, poi potete richiuderla. In tasca mi viene qualche centesimo e mi copre quelle poche spese di dominio e sito internet. Grazie mille davvero.
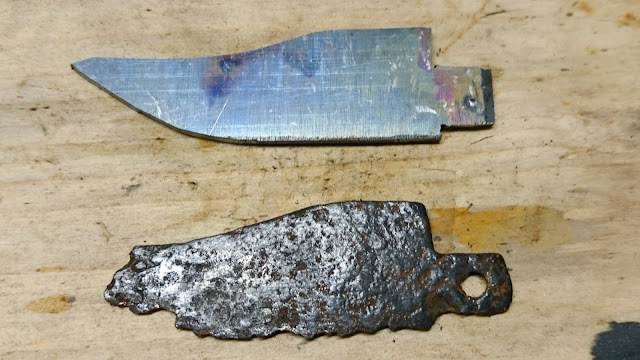
Ecco la lama "pulita" col collarino in rame o ottone, ci sono andato leggero perchè non ne sarebbe rimasto nulla. La cosa che mi ha fermato dal buttarlo è stata quella specie di lettera L seguita da un punto e forse le tracce di una B.
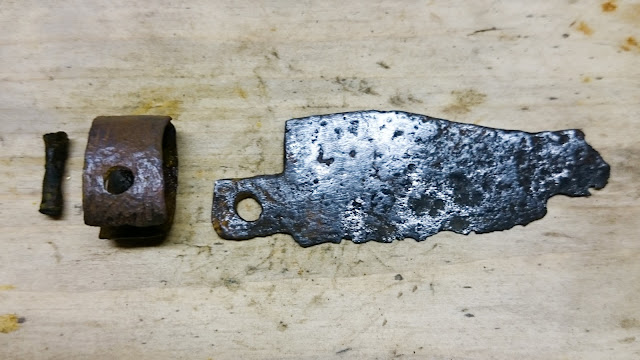

A questo punto ho iniziato le ricerche, mi sono logicamente concentrato sui coltelli della zona, ed ecco che poco dopo m'imbatto in questi siti
in cui si parla del coltello frabosano, o meglio Frabusan, e si fa cenno a un certo Liprandi che già li produceva nel XIX secolo e forse addirittura alla fine del 1700. Che sia proprio il rimasuglio di uno di questi vecchi coltelli piemontesi? Magari usato da un nostro avo che era stato inviato a difendere le sue terre dal francese invasore?
Non lo sapremo mai, ma la forma della lama, la L ben visibile, la decorazione del collarino fan proprio ben sperare.
Passa qualche tempo e continuo a trovarmi la lama ogni volta che metto a posto il banco da lavoro, sono indeciso se gettarlo o cosa farne, in vetrina non ci può finire in quello stato ed è così che mi viene un'idea malsana, provare a ricostruirlo come doveva essere.
Per prima cosa ricavare la lama.


Ho preso un pezzo della lama di una sega a nastro industriale di 2 mm di spessore e ho iniziato a lavorarlo.


Ho poi segnato una linea a metà spessore usando una punta per trapano da 2 mm e iniziato a limare.
Sono arrivato ad avere il filo che fosse circa mezzo millimetro, la finitura verrà data dopo la tempra con carta vetro e pietra.
Sono arrivato ad avere il filo che fosse circa mezzo millimetro, la finitura verrà data dopo la tempra con carta vetro e pietra.


A questo punto ho iniziato a pensare a come sarebbe dovuto essere il manico, purtroppo non ho trovato molte informazioni, le uniche foto in cui si vedeva in maniera decente un frabusan erano queste:


Le ho trovate su questa bacheca pinterest https://it.pinterest.com/fedcarlini/italian-traditional-knives/.
Ho anche appreso che le decorazioni sul manico, normalmente in bosso, indicano il mastro coltellinaio che lo ha prodotto. Sono una specie di marchio di fabbrica, ognuno aveva il suo decoro, diverso da tutti gli altri.
Per iniziare ho preso il manico di un vecchio martello che si era spezzato e l'ho recuperato per lo scopo.


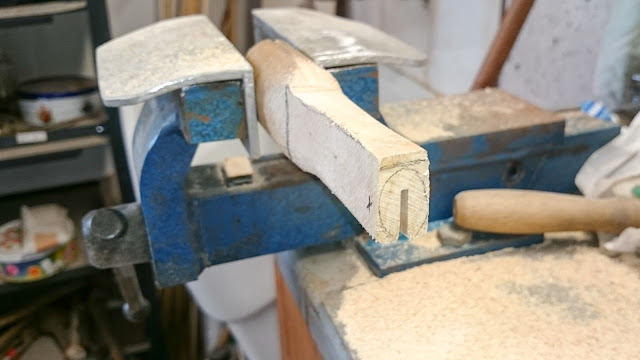


Quando il manico mi è sembrato che avesse una forma soddisfacente ho iniziato a lavorare sul collarino. Questa è stata la parte più difficile perchè era la prima volta che lo facevo e far adattare il lamierino di ottone alla forma del manico non è stato semplice.
Per prima cosa ho tracciato una linea della misura del collarino e ho iniziato ad asportare materiale per uno spessore di 1 mm.


Facendo ruotare su un foglio di carta il manico ho tracciato la dimensione del collarino, ho poi usato il foglio per segnare i fori di fissaggio per la lama.
Per iniziare ho preso il manico di un vecchio martello che si era spezzato e l'ho recuperato per lo scopo.


Quando il manico mi è sembrato che avesse una forma soddisfacente ho iniziato a lavorare sul collarino. Questa è stata la parte più difficile perchè era la prima volta che lo facevo e far adattare il lamierino di ottone alla forma del manico non è stato semplice.
Per prima cosa ho tracciato una linea della misura del collarino e ho iniziato ad asportare materiale per uno spessore di 1 mm.


Facendo ruotare su un foglio di carta il manico ho tracciato la dimensione del collarino, ho poi usato il foglio per segnare i fori di fissaggio per la lama.

La prima piega l'ho fatta a mano, poi mi sono aiutato con la morsa e un pezzo di legno sul dorso del coltello per tenere il collarino a filo del manico. Ogni tanto il collarino andava scaldato con una fiamma per renderlo più malleabile.


Una volta che il collarino si adattava al manico, l'ho incollato e forato utilizzando il foglietto di carta che avevo disegnato in precedenza. Durante questa fase per non sformare il manico o spezzarlo ho inserito la lama all'interno come spessore.


Adesso che il manico e il collarino erano finiti era ora di terminare la lavorazione della lama.
Il primo passo è stato la tempra, per eseguirla, essendo la lama piccola, l'ho semplicemente scaldata al rosso ciliegia con l'aiuto di un cannello. In seguito l'ho immersa in olio. E' molto piccola quindi non è il caso di farsi troppi problemi su come inserirla, io l'ho semplicemente buttata a bagno.


Una volta eseguita la tempra è necessario il rinvenimento che serve a eliminare le tensioni interne che si sono create durante lo shock termico. Per questa operazione ho lasciato la lama in forno a 180 °C per un'ora.
Il primo passo è stato la tempra, per eseguirla, essendo la lama piccola, l'ho semplicemente scaldata al rosso ciliegia con l'aiuto di un cannello. In seguito l'ho immersa in olio. E' molto piccola quindi non è il caso di farsi troppi problemi su come inserirla, io l'ho semplicemente buttata a bagno.


Dopo il bagno si presentava così.

Dopo il rinvenimento ho iniziato a lavorare con la carta vetro a grana sempre più fine per pulire e dare il filo alla lama.
Dopo alcune ore di lavoro e tanta pazienza la lama era finalmente degna di essere chiamata con quel nome.

A questo punto ho montato il tutto.


Come perno ho usato un chiodo precedentemente stemprato. In questa fase ho avuto un problema, il primo che avevo usato mi si è rotto all'interno durante il martellamento così ho dovuto rimuoverlo creando un piccolo segno sul collarino.
Non ho messo decorazioni ne sul manico ne sul collarino perché, come spiegato precedentemente, sono personalizzazioni che mettevano i veri mastri coltellinai.
Ed eccolo infine con cosa rimane del suo trisavolo malconcio.

This evening of stories and pictures I wanted to show the last job I did. In fact it is a bit 'of time I began, but work has lengthened a bit'. This spring, during one of the first mountain tours have been in the area of Termini Colla, it even wrote an article about it here
http://storieefoto.blogspot.it/2016/07/dalla-colla-dei-termini-al-pizzo-di.html
during lunch, under a stone I find the garbage, as usually happens those who go to the mountains is not very polite and leave their waste wherever it happens. I start to put it in my bag of waste to take to the valley and find a piece of rusty iron, for them I put them with the rest. When I get home I realize that was what remained of a boxcutter. I'm about to throw it when myself doubt whether that piece of knife could be old and still being on an ancient place of eighteenth camps I stop a moment and try to give it a clean.
http://www.comune.frabosasoprana.cn.it/Home/Guidaalpaese/tabid/28454/Default.aspx?IDDettaglio=11351
here it says the frabosano knife, or rather Frabusan, and motions to a certain Liprandi already producing them in the nineteenth century, and perhaps even the end of 1700. That is just the remnant of one of these old Piedmont knives? Maybe it used by our ancestors who had been sent to defend their lands from invading French? We'll never know, but the shape of the blade, L prominently, the decoration of their collar fans hope. It passes some time and I continue to find the blade every time I put in place the workbench, are undecided whether to throw it or what to do, we can not finish in the window in that state and that's how it is a bizarre idea, I try to rebuild it as it should be. First we derive the blade.
I took a piece of the blade of an industrial band saw 2 mm thick and I started to work it.
I then marked a halfway line thickness using a 2 mm drill bit and started to shave. Have come to have the thread which was about half a millimeter, the finish will be given after the hardening with glass and stone paper. At this point I started to think about how it would have been the handle, unfortunately I have not found much information, the only photos in which you could see in a decent a frabusan were these: I found this board pinterest https://it.pinterest.com/fedcarlini/italian-traditional-knives/. I also learned that the decorations on the handle, normally in boxwood, indicate the master knife maker that produced it. They are a sort of trademark, each had its decor, unlike any other. To start I took the handle of an old hammer that were broken and I made up for the purpose.
By rotating on a sheet of paper the handle I plotted the size of the collar, I then used the sheet to mark the fixing holes for the blade.
The first fold I made it by hand, then I helped with the vice and a piece of wood on the back of the knife to hold the collar of the handle wire. Sometimes the collar was heated with a flame to make it more malleable.
Once the collar is fitted to the handle, the I glued and drilled using the slip of paper that had drawn previously. During this phase I inserted the blade inside and a thickness of not unmold the handle or break it.
At this point with a belt grinder I finished and drew the whole. Now that the neck and the collar were over it was time to end the processing of the blade. The first step was the hardening, to execute it, being the small blade, I simply heated to cherry red with the help of a torch. Later I immersed in oil. It 'very small so it is not the case of thinking too much about how to put it, I have simply thrown to the bathroom. Once the quenching is performed the necessary tempering which serves to eliminate the internal tensions that are created during the thermal shock. For this operation I left the blade in the oven at 180 ° C for one hour. After the discovery I started working with sandpaper grit increasingly order to clean and give the thread to the blade. After a few hours of work and a lot of patience the blade was finally worthy of being called by that name. As pin I used a nail previously stemprato. At this stage I had a problem, the first I had used I broke inside during the pounding so I had to remove it by creating a small mark on the neck. I do not put decorations on the handle it on the neck because, as explained above, are customizations that put the real master knife makers. And finally here it is with what remains of his great-great grandfather battered.
Iscriviti a:
Post (Atom)