Visualizzazione post con etichetta ottone. Mostra tutti i post
Visualizzazione post con etichetta ottone. Mostra tutti i post
mercoledì 3 gennaio 2024
Pulizia bossoli della seconda guerra mondiale - Cleaning old ww2
Video, forse banale, sulla pulizia o #restauro di #bossoli e materiale in ottone, bronzo o rame della seconda guerra mondiale.

mercoledì 19 ottobre 2022
Fusione artiglio di velociraptor in ottone - Test fornace per metalli
Ho provato a fondere del metallo di scarto per ottenere un artiglio di velociraptor in dimensione reali.
Il calco in sabbia l'ho realizzato stampandolo precedentemente in 3d e rifinendolo con stucco da carroziere.
Lo trovate nel video 33.
Sotto qualche link per chi volesse mettersi in gioco.
Qui l'unboxing del fornetto appena arrivato.
Il calco in sabbia l'ho realizzato stampandolo precedentemente in 3d e rifinendolo con stucco da carroziere.
Lo trovate nel video 33.
Qui l'unboxing del fornetto appena arrivato.
Fronace per metalli
https://amzn.to/3CVBd8c
https://amzn.to/36zV7Kc
Kit sabbia e forme
https://amzn.to/3Tcqzkv
30 Kg di terra per fonderia
https://amzn.to/3CK3cIH
venerdì 2 settembre 2022
Come restaurare un vecchio rubinetto da fontana in bronzo
Questa volta vediamo come pulire e rimettere in funzione un vecchio rubinetto da fontana.
Se ne vedono ancora in giro nelle vecchie case.
Non ha dadi esagonali ma quadrati quindi l'epoca è quasi certamente attorno agli inizi del '900.
I metodi che vedete nel video vanno bene per pulire oggetti in rame ed ottone.
Ecco qualche utensile utile usato nel video
Svitol https://amzn.to/3caKn8e Fiamma Super Gas Kemper https://amzn.to/3AOviTn Ricarica Supergas https://amzn.to/3wlJ0u2 Stura lavandini con acido solforico https://amzn.to/3Ckp9zj Il mio avvitatore a batteria https://amzn.to/3PI14oU Spazzola d'acciaio https://amzn.to/3dIC0kx Guarnizioni https://amzn.to/3dQzUPK Dreemel https://amzn.to/3FYQJBf Spazzola acciaio originale https://amzn.to/2Zf1pYb Qualche link ai miei social Sito Web https://storieefoto.blogspot.com Pagina instagram https://www.instagram.com/storieefoto Pagina Facebook https://www.facebook.com/storieefoto
mercoledì 3 febbraio 2016
Restauro fiasca porta polvere da sparo per armi ad avancarica e oggetti in lamiera di rame
Ciao a tutti, è da un po' che non pubblico più nulla, ma sto attraversando un periodo non proprio facile quindi il tempo per dedicarmi agli hobby è sempre pochissimo.
Poco tempo fa mi sono finiti tra le mani i resti di una fiasca porta polvere da sparo usata un tempo per caricare le armi ad avancarica prima di ogni tiro.
Chissà per quale motivo era stata schiacciata e avevano provato a tagliarne una fetta sul fondo come si vedrà dalle foto sotto. Probabilmente volevano trasformarla in una specie di imbuto visto che anche il beccuccio era appiattito.
Prima di andare avanti vi chiederei, dato che tutto quello che faccio è per passione, se poteste gentilmente fare un click sulle pubblicità a destra. Si aprirà una pagina di sponsor, a voi non costa niente e non ci sono virus essendo tutte pubblicità di google, poi potete richiuderla. In tasca mi viene qualche centesimo e mi copre quelle poche spese di dominio e sito internet. Grazie mille davvero.
Purtroppo era davvero mal messa e quindi ho tentato un ripristino, cercando di fare una riparazione come avrebbero potuto fare all'epoca in cui era in uso la fiasca. Forse, dal punto di vista estetico, avrei avuto risultati migliori con resine composite o cose simili, ma ho deciso che avrebbe avuto più senso storico la mia scelta.
Mi sono quindi deciso ad operare una saldatura a stagno tra le parti rimaste che, una volta raddrizzate, con mia grande sorpresa combaciavano abbastanza bene.
Per ridare una curvatura accettabile alla fiasca ho lavorato dall'interno con un lungo pezzo di legno robusto con cui cercavo di fare leva sulla lamiera.
Non è stato semplice ma alla fine mi reputo soddisfatto del lavoro.
Per poter far si che la saldatura tenesse ho dovuto prima disossidare le parti con acido solforico e spazzolare bene il tutto portando a nudo il metallo.
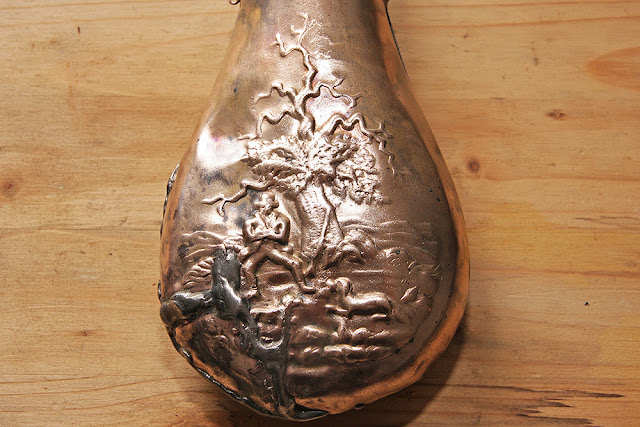
Per questo motivo alla fine ho deciso di riportare tutta la fiasca sul metallo come doveva essere quando era nuova se no la parte saldata sarebbe stata un pugno in un occhio, il rame ossida in fretta e nel giro di qualche anno sarà di nuovo scura come quando l'ho trovata.
Veniamo ora a qualche foto delle varie fasi di lavorazione.
Ecco lo stato in cui è uscita dagli scaffali, completamente appiattita e rovinata in fondo.

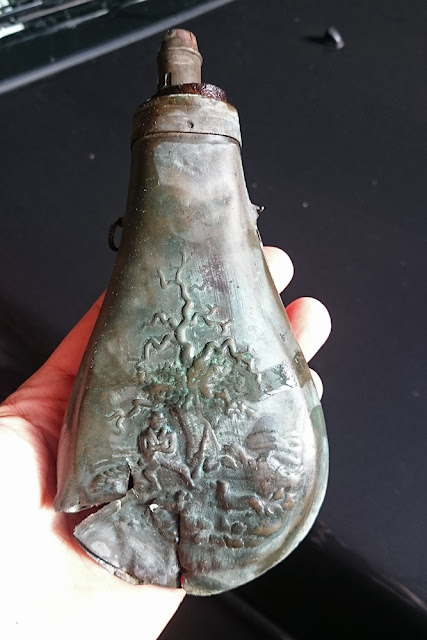






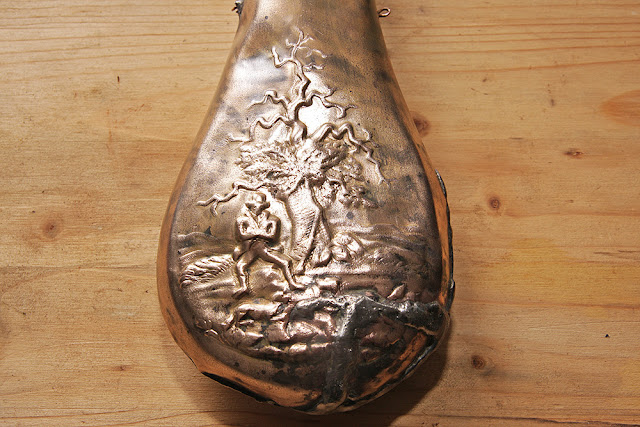


Poco tempo fa mi sono finiti tra le mani i resti di una fiasca porta polvere da sparo usata un tempo per caricare le armi ad avancarica prima di ogni tiro.
Chissà per quale motivo era stata schiacciata e avevano provato a tagliarne una fetta sul fondo come si vedrà dalle foto sotto. Probabilmente volevano trasformarla in una specie di imbuto visto che anche il beccuccio era appiattito.
Prima di andare avanti vi chiederei, dato che tutto quello che faccio è per passione, se poteste gentilmente fare un click sulle pubblicità a destra. Si aprirà una pagina di sponsor, a voi non costa niente e non ci sono virus essendo tutte pubblicità di google, poi potete richiuderla. In tasca mi viene qualche centesimo e mi copre quelle poche spese di dominio e sito internet. Grazie mille davvero.
Purtroppo era davvero mal messa e quindi ho tentato un ripristino, cercando di fare una riparazione come avrebbero potuto fare all'epoca in cui era in uso la fiasca. Forse, dal punto di vista estetico, avrei avuto risultati migliori con resine composite o cose simili, ma ho deciso che avrebbe avuto più senso storico la mia scelta.
Mi sono quindi deciso ad operare una saldatura a stagno tra le parti rimaste che, una volta raddrizzate, con mia grande sorpresa combaciavano abbastanza bene.
Per ridare una curvatura accettabile alla fiasca ho lavorato dall'interno con un lungo pezzo di legno robusto con cui cercavo di fare leva sulla lamiera.
Non è stato semplice ma alla fine mi reputo soddisfatto del lavoro.
Per poter far si che la saldatura tenesse ho dovuto prima disossidare le parti con acido solforico e spazzolare bene il tutto portando a nudo il metallo.
Per questo motivo alla fine ho deciso di riportare tutta la fiasca sul metallo come doveva essere quando era nuova se no la parte saldata sarebbe stata un pugno in un occhio, il rame ossida in fretta e nel giro di qualche anno sarà di nuovo scura come quando l'ho trovata.
Veniamo ora a qualche foto delle varie fasi di lavorazione.
Ecco lo stato in cui è uscita dagli scaffali, completamente appiattita e rovinata in fondo.


Sono evidenti i segni di taglio


Per prima cosa ho smontato il tappo e ho messo le parti in ferro molto consumate a bagno in evaporust visto che non volevo rischiare di comprometterne la funzionalità. Fortunatamente la vite è venuta via bene.


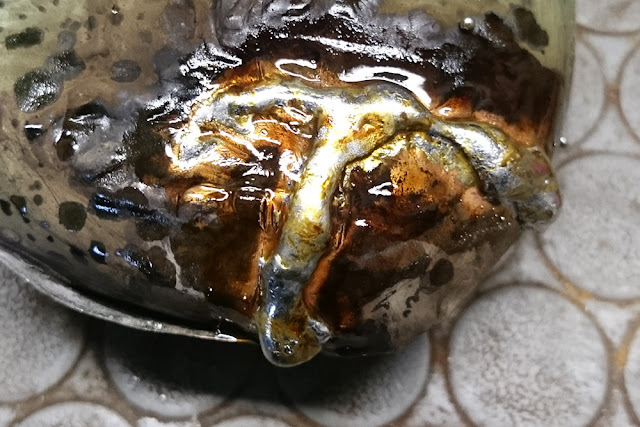
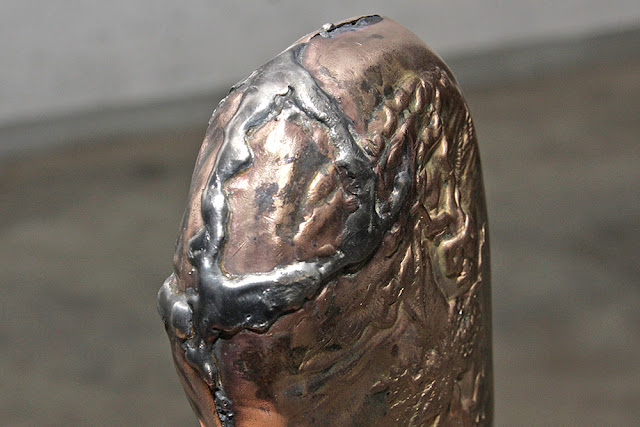
Ho poi cercato di raddrizzare i pezzi tagliati e accartocciati e ho iniziato la saldatura. Non è stato facile, perchè, seppur combaciavano abbastanza, c'erano comunque delle mancanze e la lamiera vecchia tendeva a spaccarsi quando si cercava di raddrizzarla.

In prima battuta non mi sono preoccupato di quanto stagno usavo e di quanto era bella la saldatura tanto avrei grattato via il surplus in seguito.


Ed ecco le saldature finite, come si nota bene da quella di sinistra, una volta finite le ho lisciate con una lima e ripassando la fiamma sopra le ho rese meno fastidiose.


Aggiornamento del 08/04/2016.
Guardate dopo solo due mesi come si è già scurita.

Some time ago I received the remains of a flask for powder gun used to load the weapons muzzle-loading before each shot.
For some reason had been crushed and had tried to cut off a slice on the bottom as you will see from the photos below. Probably they wanted to turn it into a kind of funnel seen that the nozzle was flattened.
Before going further I would ask you, because everything I do is for passion, if you could kindly do click on ads on the right. Will open a sponsors page, you costs nothing and there are no viruses being all google advertising, then you can close it. I get a few cents in his pocket and covered my expenses and those few domain website. Thank you very much indeed.
Unfortunately it was very drafty and so I tried a restore, trying to make a repair as they could have done at the time when it was in use. Perhaps, from an aesthetic point of view, I would have had better results with composite resins or the like, but I decided I would have had more historical sense my choice.
I therefore decided to make a soldering between the remaining parties that straight, to my surprise matched pretty well.
To give a curvature acceptable to the flask I worked from the inside with a long sturdy wooden piece with which I tried to pry the sheet.
It was not easy but in the end I consider myself satisfied with the work.
In order to ensure that the weld held I had before deoxidize the parts with sulfuric acid and brush carefully.
For this reason I decided dieliminare tuttele fouling as it should be when it was new. The copper oxidizes quickly, and within a few years will be back as dark as when I found her.
We now come to some pictures of the various processing stages.
Here is the state in which it is output from the shelves completely flattened and damaged at the bottom.
First I removed the cap and put the iron parts consumed at evaporust bathroom because I did not want to risk compromising functionality. Fortunately the screw came off well.
I then try to straighten the cut pieces and crumpled, and I started welding. It was not easy, because, although matched enough, there were still shortages and the old sheet tended to split when they tried to straighten it.
At first I did not care how I used tin and how beautiful she was welding so I scraped off the surplus later.
And here's the finished welds, as can be clearly seen from the left, once finished I smoothed with a file and rehearsing the flame over I made less ugly.
Update of 08/04/2016.
Look after only two months as already darkened.
For some reason had been crushed and had tried to cut off a slice on the bottom as you will see from the photos below. Probably they wanted to turn it into a kind of funnel seen that the nozzle was flattened.
Before going further I would ask you, because everything I do is for passion, if you could kindly do click on ads on the right. Will open a sponsors page, you costs nothing and there are no viruses being all google advertising, then you can close it. I get a few cents in his pocket and covered my expenses and those few domain website. Thank you very much indeed.
Unfortunately it was very drafty and so I tried a restore, trying to make a repair as they could have done at the time when it was in use. Perhaps, from an aesthetic point of view, I would have had better results with composite resins or the like, but I decided I would have had more historical sense my choice.
I therefore decided to make a soldering between the remaining parties that straight, to my surprise matched pretty well.
To give a curvature acceptable to the flask I worked from the inside with a long sturdy wooden piece with which I tried to pry the sheet.
It was not easy but in the end I consider myself satisfied with the work.
In order to ensure that the weld held I had before deoxidize the parts with sulfuric acid and brush carefully.
For this reason I decided dieliminare tuttele fouling as it should be when it was new. The copper oxidizes quickly, and within a few years will be back as dark as when I found her.
We now come to some pictures of the various processing stages.
Here is the state in which it is output from the shelves completely flattened and damaged at the bottom.
First I removed the cap and put the iron parts consumed at evaporust bathroom because I did not want to risk compromising functionality. Fortunately the screw came off well.
I then try to straighten the cut pieces and crumpled, and I started welding. It was not easy, because, although matched enough, there were still shortages and the old sheet tended to split when they tried to straighten it.
At first I did not care how I used tin and how beautiful she was welding so I scraped off the surplus later.
And here's the finished welds, as can be clearly seen from the left, once finished I smoothed with a file and rehearsing the flame over I made less ugly.
Update of 08/04/2016.
Look after only two months as already darkened.
Iscriviti a:
Post (Atom)