http://storieefoto.blogspot.it/2016/02/prova-test-handycam-xiaomi-yi.html
per vedere se riuscivo a migliorare l'audio davvero penoso della Xiaomi Yi e eliminare il problema legato al brusio audio quando il wifi è acceso.
Direi che ci sono riuscito discretamente e che l'operazione è alla portata di tutti. Come sempre prima di andare avanti vi chiederei, dato che tutto quello che faccio è per passione, se poteste gentilmente fare qualche click sulle pubblicità a destra o sotto. Si aprirà una pagina di sponsor, a voi non costa niente e non ci sono virus essendo tutte pubblicità di google, poi potete richiuderla. In tasca mi viene qualche centesimo e mi copre quelle poche spese di dominio e sito internet. Grazie mille davvero.
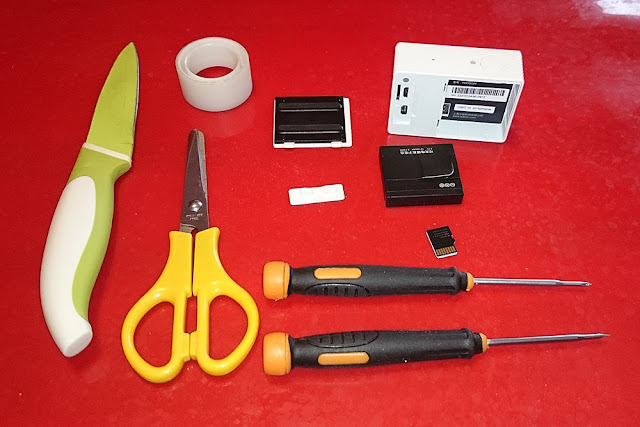
Per prima cosa dovete munirvi di un set di cacciaviti da orologiaio, una lama e un pezzettino di scotch ora potete togliere dalla vostra videocamera scheda e batteria.
A questo punto procedete a rimuovere la protezione in plastica anteriore. E' sufficiente aiutarsi con una lama sottile o un pezzo di plastica rigido se avete paura di rovinarla. Procedete con cautela seguendo il bordo, non sarà difficile.
In breve riuscirete a staccare i vari incastri dividendo le due parti di plastica e mettendo a nudo la scheda elettronica interna della Xiaomi.
A questo punto dovete rimuovere le 4 viti poste negli angoli della camera, come vedete dalla foto sottostante su una vite è posto il sigillo di garanzia, logicamente la annullerete facendo queste manovre.
Una volta rimosse le viti potete iniziare a estrarre la parte elettronica facendo leva lateralmente, fate piano in modo da non strappare i connettori delle varie parti. Lavorate un po' da un lato e un po' dall'altro, pian piano verrà fuori tutta la circuiteria. L'unico pezzo che vi rimarrà attaccato alla plastica è il microfono. Fate attenzione a non strappare i due cavetti che lo collegano al resto della Xiaomi e con delicatezza rimuovete anchesso dalla sua sede in plastica.
Rimuovete la gomma che protegge lateralmente il microfono e togliete la protezione nera rivolta verso l'esterno della camera.
Ora il microfono è libero e riuscirà a captare meglio i suoni che gli arrivano dall'esterno. Visto che c'ero ho anche allargato leggermente il foro nella plastica.
A questo punto potete rimontare tutta la parte elettronica all'interno del case in plastica. Prima di chiudere il coperchio vi suggerirei di risolvere anche il problema dell'audio legato al wifi acceso. Se la vostra camera presenta quel fastidioso brusio durante le registrazione fatte col wifi acceso procedete come segue.
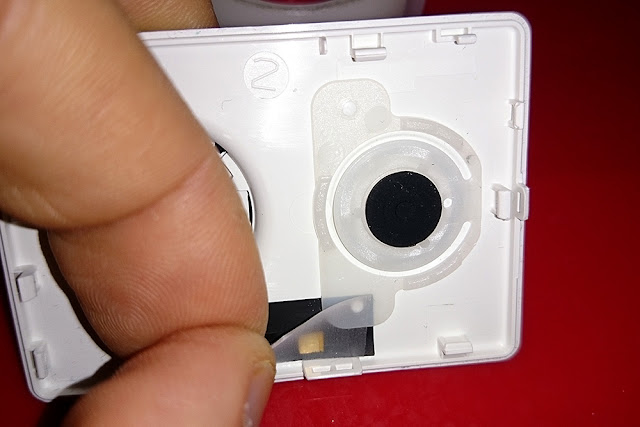
Quando avete rimontato tutta la parte elettronica prendete il coperchio frontale ed individuate l'antenna nera situata in basso.
Noterete che se chiudete il frontale va a fare contatto con una specie di spillo che esce dalla circuiteria. La Xiaomi funziona bene anche senza quest'antenna, quindi basta isolarla dal circuito per rimuovere i disturbi audio causati dalla stessa.
Per far ciò ritagliatevi un pezzo di scotch o nastro adesivo e incollatelo nel punto di contatto.
A questo punto richiudete il tutto e controllate che tutto funzioni.
Sotto due video fatti alla tv dalla stessa distanza di circa 50 cm con audio degli altoparlanti prima a 25 e poi a 30. Guardateveli e sentite la differenza tra il prima e il dopo della modifica. Scusatemi per il programma ma quello passava il convento... :-)
Video prima delle modifiche, prefix.
Dopo il fix audio.
L'audio non è ancora altissimo, ma almeno lo si sente e non c'è più quel fastidioso brusio.
Spero di aver aiutato qualcuno di voi.
Ciao a tutti.
Given that today still has not stopped raining I have decided to follow video guide that I posted there at the end of this article
http://storieefoto.blogspot.it/2016/02/prova-test-handycam-xiaomi-yi.html
to see if I could improve the really painful sound of Xiaomi Yi and eliminate the problem related to audio buzz when wifi is on.
I would say that I did it discreetly and that the operation is feasible by all. As always before you go ahead I ask you, given that everything I do is for passion, if you could kindly make a few clicks on the advertisement to the right or below. Will open a sponsors page, you costs nothing and there are no viruses being all google advertising, then you can close it. I get a few cents in his pocket and covered my expenses and those few domain website. Thank you very much indeed.
First you need to supply a set of watchmakers screwdrivers, a knife and a piece of scotch you can now remove from your card and camcorder battery.
At this point, proceed to remove the front plastic protection. It 'just help yourself with a thin blade or a piece of hard plastic if you are afraid to ruin it. Proceed with caution following the edge, it will not be difficult.
In short you are able to detach the various joints dividing the two plastic parts and exposing the internal electronic board of Xiaomi.
At this point you should remove the 4 screws located in the corners of the room, as you can see from the photo below of a screw is placed the seal of guarantee, logically will cancel doing these maneuvers.
Once the screws are removed you can begin to remove the electronic part by the side lever, you plan so you do not tear the connectors of the various parts. Work a little 'on one side and a bit' on the other, gradually it will come out all the circuitry. The only piece that will remain attached to the plastic is the microphone. Be careful not to tear the two wires that connect to the rest of Xiaomi and gently remove anchesso from its plastic housing.
Remove the rubber that laterally protects the microphone and remove the black cap directed toward the outside of the room.
Now the microphone is free and able to better understand the sounds that come from the outside. Since I was there I also slightly enlarged the hole in the plastic.
At this point, you refit all the electronics inside the plastic case. Before closing the lid I would suggest you also fix the audio problem when the wifi is on. If your room has that annoying buzz during the recording made with wifi turned on, proceed as follows.
When you have reinstalled all the electronics take the front cover and locate the black antenna on the bottom.
You will notice that if you close the front goes to make contact with a kind of needle that comes out circuitry. The Xiaomi works fine without this antenna, so just isolate it from the circuit to remove audio noise caused by the same.
To do this Set aside a piece of tape or adhesive tape and glue the point of contact.
At this point, close the everything and check that everything works.
Under two videos made of the TV from the same distance of about 50 cm with speaker sound before to 25 and then to 30. Look at and feel the difference between the before and after the change. Sorry for the program.
Audio is not very high, but now you can not understand and there is not that hum.
I hope I have helped some of you.
Hello to all.


Nessun commento:
Posta un commento